Installing IBM Sametime 9.0.1 „basic“ (aka. limited use) – Admincamp 2017 session

IBM released in the end of 2017 a „limited use“ version of 9.0.1 FP1.
IBM Doku: IBM Sametime 9.0.1 FP1 Limited Use release – December 2017

How to install this version, you will find a presentation from my admincamp session last year (sept. 2017)

In addition here is a short documentation how to ensure the „limited use“ license in a mixed IBM Sametime environment – IBM announced on the Think 2018 session this year, that the mobile support (via Sametime Proxy) ist planned to be added with the new Sametime version 10 until the end of the year

Push SSL x-certs to IBM Notes Client (prevent cross-cert dialog)

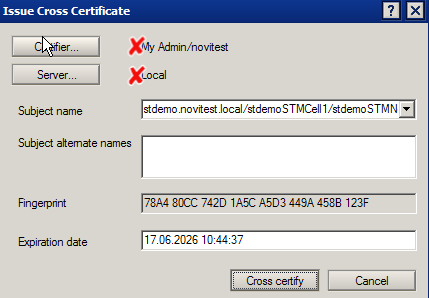
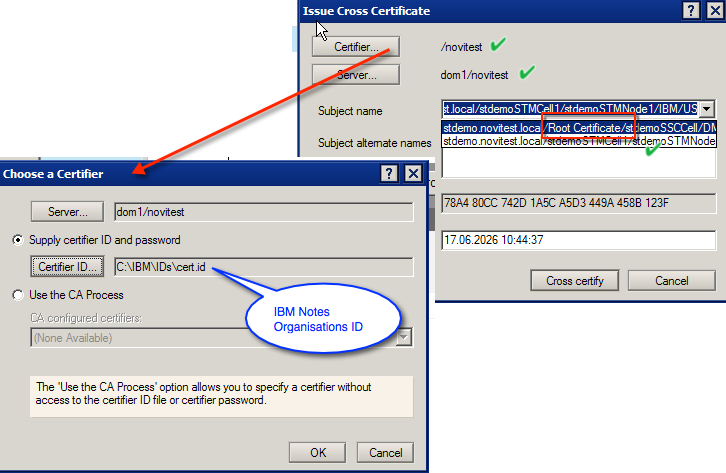
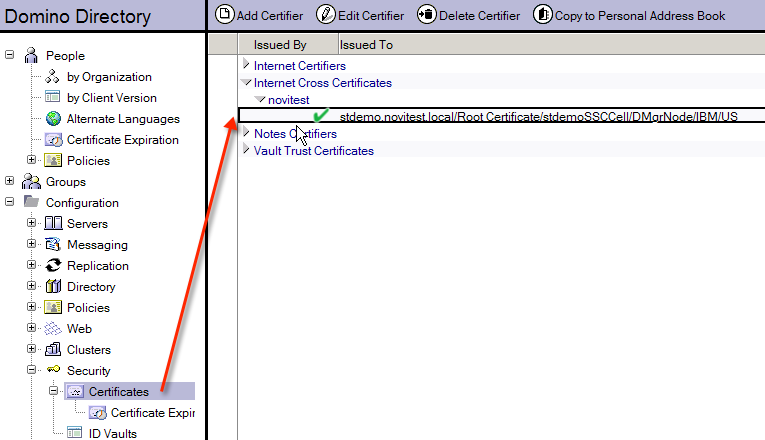
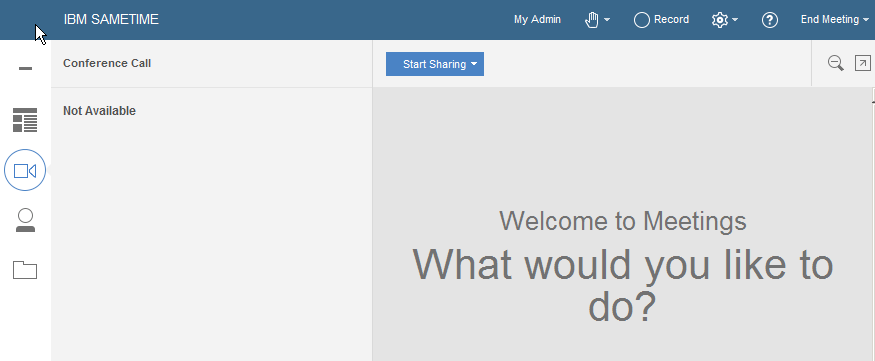
If you connect the IBM Sametime meeting oder advanced server from the IBM Notes client (plug-in) through secure connection (SSL) …

2-2016-06-17_10-44-17

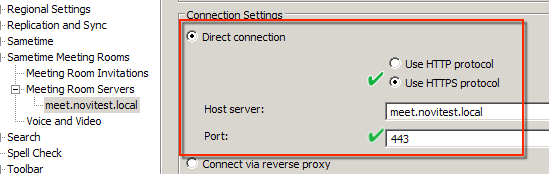
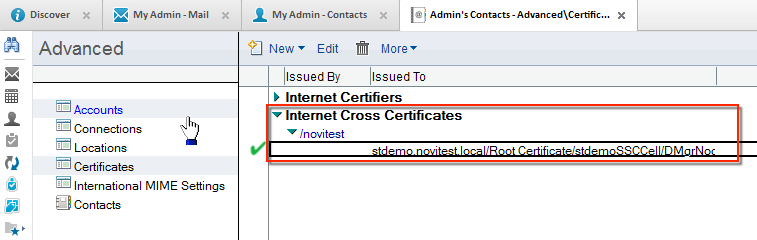
… you will get a cross certificate warning within the Notes client.

1-2016-06-17_10-44-49

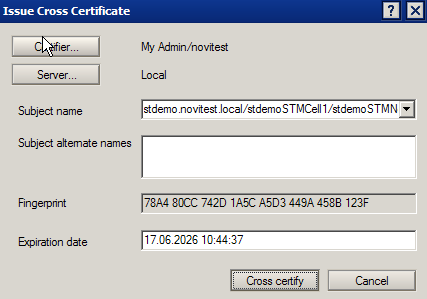
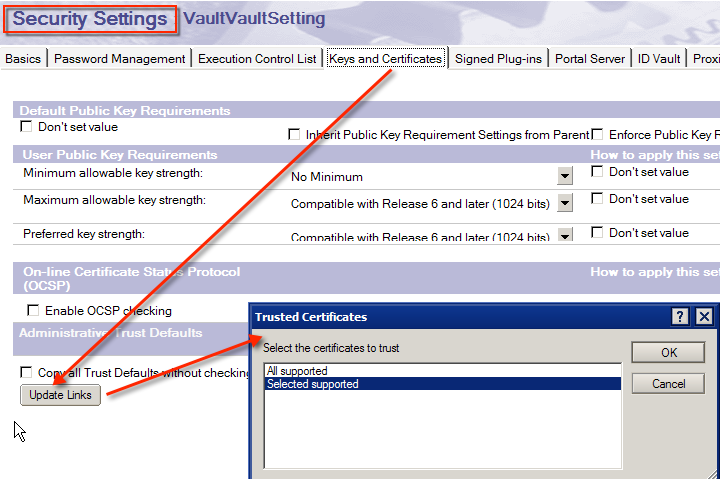
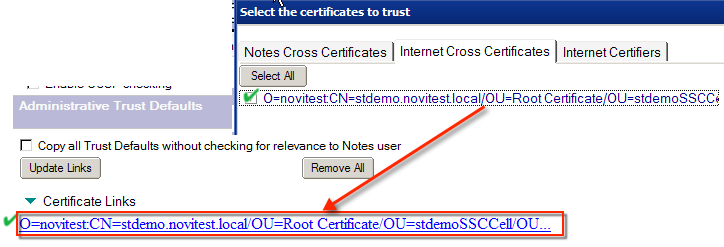
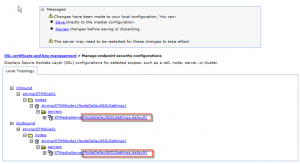
To prevent this annoying dialog within the IBM Notes client you can push this x-certs to all IBM Notes client through the IBM Domino policy.

  1. Configure a secure (SSL) connection from your IBM Notes client (administrator) to the IBM Sametime meeting (or advanced) server
    2-2016-06-17_10-44-17
  2. After you connect the first time to the IBM Sametime meeting server you should get a cross-certificate window
    ! DO NOT automatically accept it.
    You need to change the fields to save the cross-certificate to your central domino address book (names.nsf).
    3-2016-06-17_10-44-49
    NOTE: If you do not get the cross-certificate window, please check your local address book for already accepted x-certs and delete the concerning document.
  3. In the field „certifier“ select your IBM Domino organization id (e.g. /edcom/de)
    In the field „server“ select your IBM Domino administration server (could be any other Domino server who helds the names.nsf)
    In the field „subject name“ select either the Sametime Meeting Server certificate or the „trusted root“ authority
    4-2016-06-17_10-45-45
  4. Click „cross certify“ to save the cross-certificate between IBM Domino organization <> Sametime server „trusted root“ into your central IBM domino directory (names.nsf)
    5-2016-06-17_10-46-26
  5. Create or edit an IBM Domino policy  – security setting document and switch to
    >> tab „keys and certificate“ >> section „administrative trust defaults“ and press the button „Update Links“ …
    7-2016-06-17_10-46-59
    … and select the cross-certificate you created before
    6-2016-06-17_10-47-36
  6. After the next login from the IBM Notes client, the cross-certificate from the IBM Domino policy security document was saved to the local address book in the view certificates
    8-2016-06-17_10-58-05

Thats it

BTW – you could also use this documentation to push x-certs between DomOrg <> DomOrg to IBM Notes clients

Sametime 9.0.1 – error installing new SystemConsole

IBM announced IBM Sametime 9.0.1 in May this year (=>http://blog.novaknet.de/?p=2451).

This week i tried to renew my test environment – so i make a complete new installation starting with 9.0.1 Version.
So i started the installation, i did 100 times before

  • Install IBM DB2 10.5.7
  • Install Installation Mangager 1.8.4.1+
  • Install Websphere 8.5.5 + Fixpack 8
  • Create SSC Database
  • Install Sametime System Console 9.0.1

Installation was finished, but i got error messages that the SystemConsole could not register itself and i had to manually create missing tables in the System Console database with the db2-script createSchedTable.dll.
There is also a document concerning this script on the IBM Sametime wiki => Wiki: Setting the SSC db manually

So i created the table manually and tried to register SSC itself, but the Sametime Portlet gets an error („CWLAA6003: portlet could not load“).

So i thought i did a mistake and tried this again and again (on different OS) but i get every time the same error.
Then i tried to install the last Sametime System Console version 9.0 from feb., 2015 (poodle patch) and this version was installed successfully (w/o errors).

A deep analysis of the 9.0.1 SSC installation i found out, that the db-script (createSchedTable) was missing in the SSC installation script and therefore this is the problem… I think IBM has to correct the software, but i found a workaround for new installations

  • Workaround 1: Create SSC database, manually start the db2-script createSchedTable.dll, install SSC 9.0.1
  • Workaround 2: Create SSC database, Install SSC 9.0 (9.0.0.20141222_0413 – AGAR-9RHDHN), Update to SSC 9.0.1

Note: I get the same error with the latest SSC 9.0.x hotfix from april 2016 on the IBM fixcentral side (9.0.1.20160321_0851 – Fix: AGAR-A95S8V)

Here is how you manually start the db2-script

  • open DB2 command line (db2cmd)
  • db2cmd > db2 connect to STSC
  • db2cmd > db2 -tf \install\SametimeSystemConsole\DatabaseScripts\SystemConsole\createSchedTable.dll


Sametime 9.0.1 announced and available for download (update)

IBM announced today the IBM Sametime version 9.0.1. You can download this from IBM Passport Advanced site.

IBM Link: IBM Sametime 9.0.1 Complete – download sheet & IBM partnumbers

IBM Link: IBM Sametime 9.0.1 – Detailed System Requirements

UpdatedIBM Sametime 9.0.1 Documentation Wiki is now online

  • IBM DB2 10.5 + FP 7
  • IBM Installation Manager 1.8.4.1
  • IBM Webpshere 8.5.5 + Fixpack 5 (there is no information about higher fixpack level)
  • IBM Sametime 9.0.1 System Console, Meeting, Proxy, Gateway, Advanced, Media (also Video Manager & MCU) and Community Server
  • ST 9.0.1 Mac Client (64 Bit with A/V)
  • new Meetingcenter UI
    2016-05-04_18-33-02
  • and more What’s new in this release?
    • Live Update for Sametime Clients
    • Preconfigured configuration keys for the Sametime Meeting Server (not sure what this means)
    • First Party Call Control (access a third-party SIP server directly from their Sametime Client)

IBM Sametime Proxy updated APNS certificate (Apple Push Notification)

The IBM Sametime Proxy Server uses a local certificate to correctly connect to the Apple push notification service (aka APNS) so that you can see a chat request inside your IOs mobile notification screen (otherwise you have to open the IBM Sametime chat app directly to see the chat).

This is gateway.push.apple.com via port 2195 and feedback.push.apple.com via port 2196.

Because the local certificate has a limited date it will expire may the 5th 2016 and you need to exchange the certificate file on your server (with the updated certificate).

Just download the new apns certificate from the IBM fixcentral website

IBM documentation: Updated security certificate for Push Notifications (iOS)


To check if the new certificate is working just use (and download) the APNSTest tool „New Sametime Proxy APNs test application“ from collaborationben site

java -jar apnstest.jar -k apns-prod.pkcs12

Beware you need three things to work to connect to APNS

  1. You need to resolve the dns addresses for gateway.push.apple.com and feedback.push.apple.com
  2. You need to be able to connect to these addresses via port 2195 and 2196 (entire 17.0.0.0/8 net)
    IP Address Range Used by the Push Service
  3. You need a valid apns certificate

Alternatively you could update to the latest Sametime Proxy fix from april 2016, but you have to update the Sametime System Console first to fix april 2016.

Sametime System Console Hotfix – ST30.25 build or 9.0.1 [April 2016]

Cumulative Hotfix for Sametime Proxy -ST30.25 build or 9.0.1 [April 2016]


APNS explained

  • gateway.push.apple.com:2195 = Apple notification server host name and port are used by the Sametime Proxy Server to send Sametime instant messages, meeting invitations, and announcements to iPhone users. When a user pauses receipt of messages, the Sametime Proxy Server database holds messages until the user views the messages or the mobile device’s pause time expires.
  • feedback.push.apple.com:2196 = Apple feedback service keeps track of which iPhone mobile devices are still valid and sends the information to the Sametime Proxy Server.

Sametime Video Manager expired certificate – exchange root cert and trust 15 years

This is an old one, but it seems it happens a lot of again.

With the installation of the IBM Sametime Video Manager gold edition (sept. 2013), the Video Manager generates an self-signed one year valid ssl certificate.

2016-04-22_11-46-20

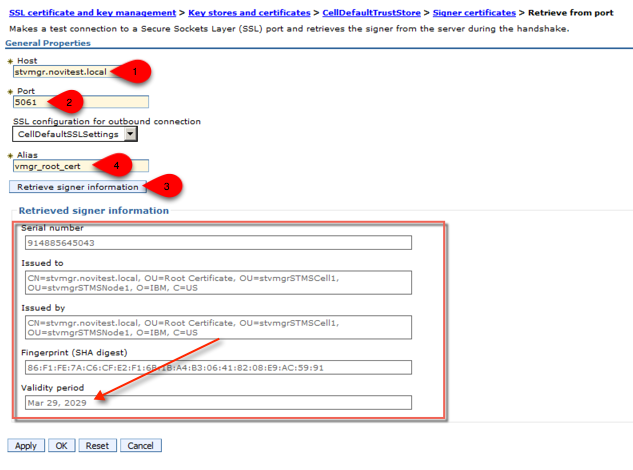
This certificate has to be trusted inside the Sametime Media System to connect via port 5061/5081 between Media Conference Bridge and Video Manager

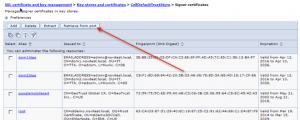
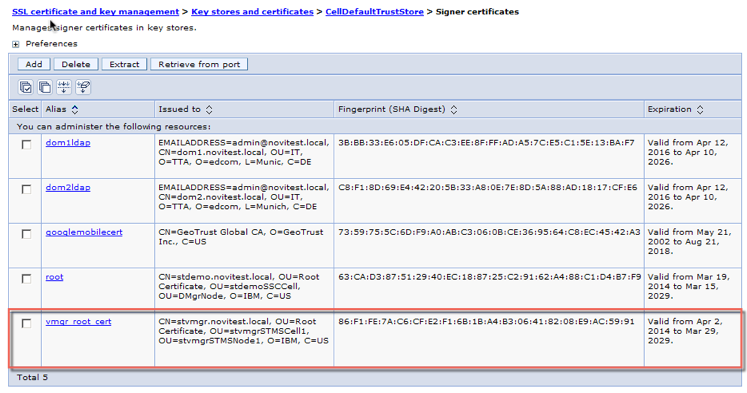
IBM Wiki: Import the Video Manager’s certificate to the Conference Manager

After a year you get a new self-signed certificate on the Video manager and the connection between Media Conference Bridge and Video Manager ist broken (error 503). You could trust the new Video Manager certificate inside the Media Conference Bridge, but this is – again – for one year.

IBM already documented to change the certificate to a longer valid certificate or root certificate (15 years).

IBM Docu: Sametime 9 Video Manager – A/V call fails due to default root certificate expires in one year

Because of many people having problem with this documentation i will give you some more details and screenshots for this to work (from zero2hero)


  1. Login to the Sametime Video Manager ISC (https://yourvmgrserver:9043/ibm/console)
  2. Navigate to Security > SSL certificate & key management > key stores & certificates
  3. Select the option (or key store) NodeVMGRKeyStore
  4. Navigate to personal certificate and press the button „import certificate from a key
    2016-04-22_11-52-39-2
  5. Select the key store NodeDefaultKeyStore and enter the key store password (use „WebAS“ because it is the default password for all websphere based keystores) and press button „Get key store aliases
  6. Select in the field certificate alias to import the value default and press the button OK
    2016-04-22_11-49-31

  7. You should now see a certificate called default with a self-signed root certificate (valid for 15years) in common.
    Press SAVE to write the master configuration.
    2016-04-22_11-52-39
    You now need to assign the new certificate to the application server
  8. Navigate to Security > SSL certificate & key management > Manage endpoint security configurations
    • Expand the INBOUND tree until you see the application server name STMediaServer
    • Klick on the servername STMediaServer
    • Select „override inherited values„, select NodeDefaultSSLSetting configuration, select default certificate alias and press the button OK
      2016-04-22_11-53-46
      Repeat this for the OUTBOUND tree until you see the application server name STMediaServer
    • Expand the OUTBOUND tree until you see the application server name STMediaServer
    • Klick on the servername STMediaServer
    • Select „override inherited values„, select NodeDefaultSSLSetting configuration, select default certificate alias and press the button OK
  9. Press SAVE to write the master configuration.
  10. Check the values in the endpoint security tree
    2016-04-22_11-54-32
  11. Restart the Sametime Video Manager in the following order
    • stop STMediaServer_was.init (via service or batch)
    • stop soliddb (via service or batch)
    • start soliddb (via service or batch)
    • WAIT 60 seconds
    • start STMediaServer_was.init (via service or batch)

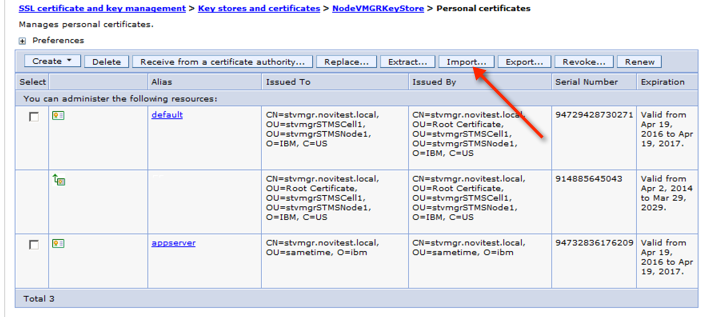
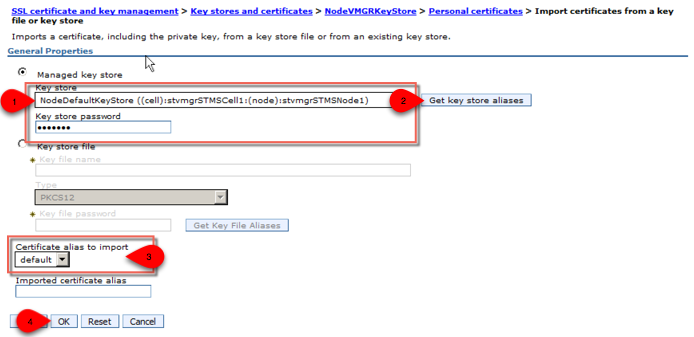
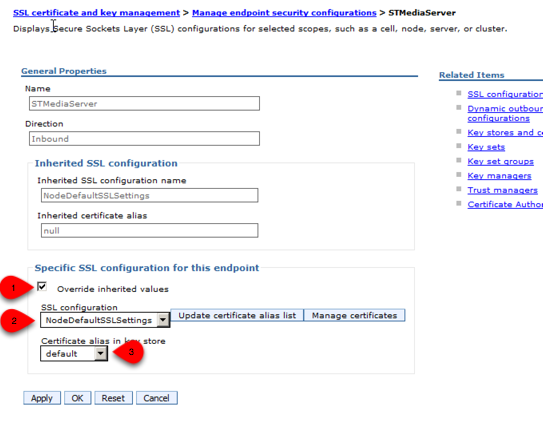
After this you need to import the new Video Manager certificate into the Media Conference Bridge.

  1. Login to the Sametime System Console ISC (https://yoursscserver:8701/ibm/console)
  2. Navigate to Security > SSL certificate & key management > key stores & certificates
  3. Select the option (or key store) CellDefaultTrustStore
    >> you could delete the old Video Manager certificate if you wish
  4. Navigate to signer certificate and press the button „retrieve from port
    2016-04-22_15-40-30
  5. Enter the hostname for the Video Manager (e.g. myvmgrserver.dns.local) enter the port 5061 (or any other ssl port) an press the button „Retrieve signer information
    You should see now the new Video Manager root certificate – valid for 15 years
    2016-04-22_12-22-55
  6. Enter an alias name for the certificate e.g. vmgr_cert  and press the button OK
  7. You should now see a trust certificate called vmg_cert  (valid for 15years).
    2016-04-22_15-40-30-2
    Press SAVE to write the master configuration.
  8. Navigate to System administration > Nodes select all nodes and press „full synchronize“ to push the new certificate to the all applications servers
    2016-04-22_12-24-32
    Because of having problems with the shutdown of the application server(s) after importing or changing certificates (shutdown is waiting to manually accept new certificates) i do manually retrieve the keys from the node with the following command
    >>  „<appserverbin>\profiles\<profilename>\bin\retrievesigners -host stsscserver -port 8703
    Systemdesign2
  9. Restart the Sametime Media Server (proxy registrar and/or conference bridge)
  10. Navigate to Sametime System Console > Sametime Servers > Sametime Video Manager Servers and check if you could connect to the Video Manager configuration
    2016-04-22_12-56-08

All done